Tambahkan Yahoo Smiley emoticon Pada Blogger / BlogSpot Halaman Komentar
Menambahkan yahoo emoticons pada platform blogger ternyata tak semudah yg saya perkirakan sebelumnya..meski hanya memerlukan ketabahan dan kesabaran dalam melihat HTML kode template anda.. juga diperlukan sedikit kopi hangat dan sebatang rokok..wawwww.. nikmat..hehehe
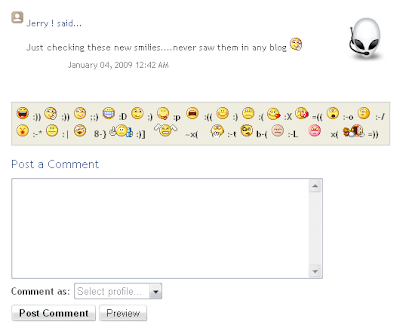
ok.. langsung aja, tampilannya akan seperti ini:
 langkah -langkahnya sebagai berikut:
1. masuk ke account blogger anda
2. layout -> EDIT HTML tab
centang Expand Widget Templates
3. Cari kode berikut :
<b:if cond='data:post.embedCommentForm'>
<b:include data='post' name='comment-form'/>
4. selanjutnya copy kode dibawah ini, dan paste diantara kedua HTML kode Diatas
<div style='-moz-background-clip: -moz-initial; -moz-background-origin: -moz-initial; -moz-background-inline-policy: -moz-initial; width: 369; text-align: left; border: 1px solid #cccccc; padding: 5px; background: #eeeddf; height:86'>
<b>
<img border='0' height='18' src='http://us.i1.yimg.com/us.yimg.com/i/mesg/emoticons7/21.gif' width='18'/> :))
<img border='0' height='18' src='http://us.i1.yimg.com/us.yimg.com/i/mesg/emoticons7/71.gif' width='18'/> ;))
<img border='0' height='18' src='http://us.i1.yimg.com/us.yimg.com/i/mesg/emoticons7/5.gif' width='18'/> ;;)
<img border='0' height='18' src='http://us.i1.yimg.com/us.yimg.com/i/mesg/emoticons7/4.gif' width='18'/> :D
<img border='0' height='18' src='http://us.i1.yimg.com/us.yimg.com/i/mesg/emoticons7/3.gif' width='18'/> ;)
<img border='0' height='18' src='http://us.i1.yimg.com/us.yimg.com/i/mesg/emoticons7/10.gif' width='18'/> :p
<img border='0' height='18' src='http://us.i1.yimg.com/us.yimg.com/i/mesg/emoticons7/20.gif' width='22'/> :((
<img border='0' height='18' src='http://us.i1.yimg.com/us.yimg.com/i/mesg/emoticons7/1.gif' width='18'/> :)
<img border='0' height='18' src='http://us.i1.yimg.com/us.yimg.com/i/mesg/emoticons7/2.gif' width='18'/> :(
<img border='0' height='18' src='http://us.i1.yimg.com/us.yimg.com/i/mesg/emoticons7/8.gif' width='18'/> :X
<img border='0' height='18' src='http://us.i1.yimg.com/us.yimg.com/i/mesg/emoticons7/12.gif' width='18'/> =((
<img border='0' height='18' src='http://us.i1.yimg.com/us.yimg.com/i/mesg/emoticons7/13.gif' width='18'/> :-o
<img border='0' height='18' src='http://us.i1.yimg.com/us.yimg.com/i/mesg/emoticons7/7.gif' width='20'/> :-/
<img border='0' height='18' src='http://us.i1.yimg.com/us.yimg.com/i/mesg/emoticons7/11.gif' width='18'/> :-*
<img border='0' height='18' src='http://us.i1.yimg.com/us.yimg.com/i/mesg/emoticons7/22.gif' width='18'/> :|
<img border='0' height='18' src='http://us.i1.yimg.com/us.yimg.com/i/mesg/emoticons7/35.gif' width='24'/> 8-}
<img border='0' height='18' src='http://us.i1.yimg.com/us.yimg.com/i/mesg/emoticons7/100.gif' width='31'/> :)]
<img border='0' height='18' src='http://us.i1.yimg.com/us.yimg.com/i/mesg/emoticons7/102.gif' width='44'/> ~x(
<img border='0' height='18' src='http://us.i1.yimg.com/us.yimg.com/i/mesg/emoticons7/104.gif' width='30'/> :-t
<img border='0' height='18' src='http://us.i1.yimg.com/us.yimg.com/i/mesg/emoticons7/66.gif' width='18'/> b-(
<img border='0' height='18' src='http://us.i1.yimg.com/us.yimg.com/i/mesg/emoticons7/62.gif' width='18'/> :-L
<img border='0' height='18' src='http://us.i1.yimg.com/us.yimg.com/i/mesg/emoticons7/14.gif' width='34'/> x(
<img border='0' height='18' src='http://us.i1.yimg.com/us.yimg.com/i/mesg/emoticons7/24.gif' width='30'/> =))
</b>
</div>
5. download file berikut:
Smiley.js ( As a zipped file )
dan upload file (smiley.js) ke situs hosting berikut ( free hosting):
1. Boxstr.com
2. HotLinkFiles.com
3. SigMirror.com
dan simpan direct link file javascript tersebut.
6. setelah langkah tadi, temukan kode HTML berikut pada template anda:
</body>
7. langkah terakhir copy file berikut ini:
<script src='http://boxstr.com/files/YSG___1238/smiley.js (ganti dengan link java script anda)' type='text/javascript'/><noscript><a href="http://bloggerstop.net" target="_blank"><span style="font-size: x-small;">Add Smilies</span></a></noscript>
8. Save Template anda dan lihat hasilnya
SELAMAT MENCOBA
langkah -langkahnya sebagai berikut:
1. masuk ke account blogger anda
2. layout -> EDIT HTML tab
centang Expand Widget Templates
3. Cari kode berikut :
<b:if cond='data:post.embedCommentForm'>
<b:include data='post' name='comment-form'/>
4. selanjutnya copy kode dibawah ini, dan paste diantara kedua HTML kode Diatas
<div style='-moz-background-clip: -moz-initial; -moz-background-origin: -moz-initial; -moz-background-inline-policy: -moz-initial; width: 369; text-align: left; border: 1px solid #cccccc; padding: 5px; background: #eeeddf; height:86'>
<b>
<img border='0' height='18' src='http://us.i1.yimg.com/us.yimg.com/i/mesg/emoticons7/21.gif' width='18'/> :))
<img border='0' height='18' src='http://us.i1.yimg.com/us.yimg.com/i/mesg/emoticons7/71.gif' width='18'/> ;))
<img border='0' height='18' src='http://us.i1.yimg.com/us.yimg.com/i/mesg/emoticons7/5.gif' width='18'/> ;;)
<img border='0' height='18' src='http://us.i1.yimg.com/us.yimg.com/i/mesg/emoticons7/4.gif' width='18'/> :D
<img border='0' height='18' src='http://us.i1.yimg.com/us.yimg.com/i/mesg/emoticons7/3.gif' width='18'/> ;)
<img border='0' height='18' src='http://us.i1.yimg.com/us.yimg.com/i/mesg/emoticons7/10.gif' width='18'/> :p
<img border='0' height='18' src='http://us.i1.yimg.com/us.yimg.com/i/mesg/emoticons7/20.gif' width='22'/> :((
<img border='0' height='18' src='http://us.i1.yimg.com/us.yimg.com/i/mesg/emoticons7/1.gif' width='18'/> :)
<img border='0' height='18' src='http://us.i1.yimg.com/us.yimg.com/i/mesg/emoticons7/2.gif' width='18'/> :(
<img border='0' height='18' src='http://us.i1.yimg.com/us.yimg.com/i/mesg/emoticons7/8.gif' width='18'/> :X
<img border='0' height='18' src='http://us.i1.yimg.com/us.yimg.com/i/mesg/emoticons7/12.gif' width='18'/> =((
<img border='0' height='18' src='http://us.i1.yimg.com/us.yimg.com/i/mesg/emoticons7/13.gif' width='18'/> :-o
<img border='0' height='18' src='http://us.i1.yimg.com/us.yimg.com/i/mesg/emoticons7/7.gif' width='20'/> :-/
<img border='0' height='18' src='http://us.i1.yimg.com/us.yimg.com/i/mesg/emoticons7/11.gif' width='18'/> :-*
<img border='0' height='18' src='http://us.i1.yimg.com/us.yimg.com/i/mesg/emoticons7/22.gif' width='18'/> :|
<img border='0' height='18' src='http://us.i1.yimg.com/us.yimg.com/i/mesg/emoticons7/35.gif' width='24'/> 8-}
<img border='0' height='18' src='http://us.i1.yimg.com/us.yimg.com/i/mesg/emoticons7/100.gif' width='31'/> :)]
<img border='0' height='18' src='http://us.i1.yimg.com/us.yimg.com/i/mesg/emoticons7/102.gif' width='44'/> ~x(
<img border='0' height='18' src='http://us.i1.yimg.com/us.yimg.com/i/mesg/emoticons7/104.gif' width='30'/> :-t
<img border='0' height='18' src='http://us.i1.yimg.com/us.yimg.com/i/mesg/emoticons7/66.gif' width='18'/> b-(
<img border='0' height='18' src='http://us.i1.yimg.com/us.yimg.com/i/mesg/emoticons7/62.gif' width='18'/> :-L
<img border='0' height='18' src='http://us.i1.yimg.com/us.yimg.com/i/mesg/emoticons7/14.gif' width='34'/> x(
<img border='0' height='18' src='http://us.i1.yimg.com/us.yimg.com/i/mesg/emoticons7/24.gif' width='30'/> =))
</b>
</div>
5. download file berikut:
Smiley.js ( As a zipped file )
dan upload file (smiley.js) ke situs hosting berikut ( free hosting):
1. Boxstr.com
2. HotLinkFiles.com
3. SigMirror.com
dan simpan direct link file javascript tersebut.
6. setelah langkah tadi, temukan kode HTML berikut pada template anda:
</body>
7. langkah terakhir copy file berikut ini:
<script src='http://boxstr.com/files/YSG___1238/smiley.js (ganti dengan link java script anda)' type='text/javascript'/><noscript><a href="http://bloggerstop.net" target="_blank"><span style="font-size: x-small;">Add Smilies</span></a></noscript>
8. Save Template anda dan lihat hasilnya
SELAMAT MENCOBA


Comments
Post a Comment